Kyojin desu (talk | contribs) (→Spreader: req added) Tag: Visual edit |
(Removed stub tag, minor fixes) |
||
| (11 intermediate revisions by 6 users not shown) | |||
| Line 1: | Line 1: | ||
| + | __FORCETOC__ |
||
| − | {{stub}} |
||
| + | [[File:Dual Roller Attack.png|center|775x775px]] |
||
| ⚫ | |||
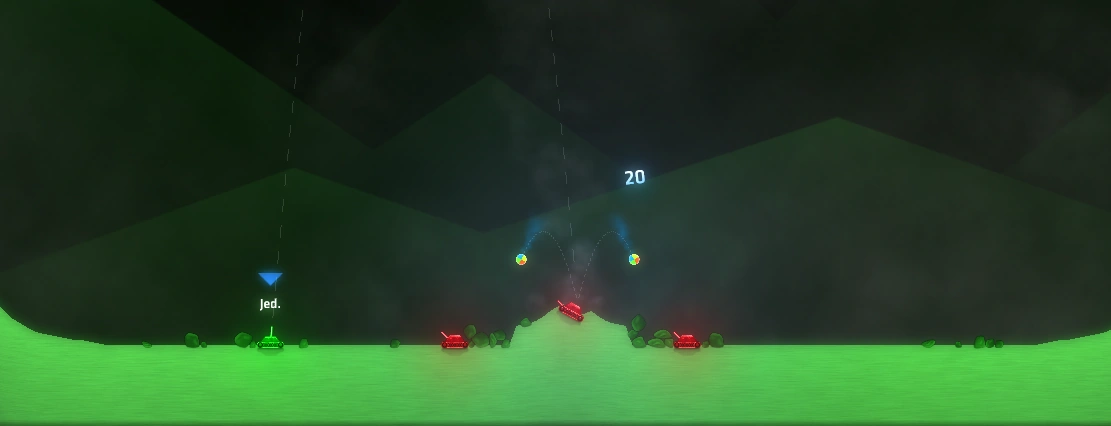
| + | Roll right? Roll left? Why not both? |
||
| ⚫ | |||
| − | |||
| − | Description |
||
{{WeaponDetail |
{{WeaponDetail |
||
| Line 9: | Line 9: | ||
| name = Dual-Roller |
| name = Dual-Roller |
||
| color = #00FF00 |
| color = #00FF00 |
||
| + | | description = The player shoots a single, very colorful Roller that can make people confused on their first shot wondering whether it will roll forward or backward. But upon impact that can deal 20 damage, it splits up to two smaller rollers moving in both directions dealing 20 more damage each. Be careful though as it can jump past enemies that are too close to the initial impact. |
||
| − | | description = This is a description |
||
| type = [[Direct Impact]] > [[Rollers]] |
| type = [[Direct Impact]] > [[Rollers]] |
||
| − | | dmg2 = |
+ | | dmg2 = 20 per ball |
| − | | radius = |
+ | | radius = 3*6(15 PU) |
| terraform = Yes |
| terraform = Yes |
||
| self = Yes |
| self = Yes |
||
| Line 22: | Line 22: | ||
| name = Spreader |
| name = Spreader |
||
| color = #00FF00 |
| color = #00FF00 |
||
| + | | description = The second and final tier turns the initial shot to a flare that looks more identical to its icon, upon landing, 9 green rollers will fall down from the sky, the first 4 moving left, the middle one staying in place, and the last four moving on the right. Some rollers move faster than the others but they all have the same lifespan and damage |
||
| − | | description = This is a description |
||
| type = [[Flares]] > [[Rollers]] |
| type = [[Flares]] > [[Rollers]] |
||
| − | | dmg = |
+ | | dmg = 15 |
| − | | proj = |
+ | | proj = 9 |
| − | | radius = |
+ | | radius = 9*6(15 PU) |
| terraform = Yes |
| terraform = Yes |
||
| self = Yes |
| self = Yes |
||
| req = 1,500 XP |
| req = 1,500 XP |
||
}} |
}} |
||
| + | |||
| + | == Tips & Trivia == |
||
| + | |||
| + | [[File:Dual Roller Optimal Placement.png|thumb|This placement at the bottom of the map ensures all parts of the dual roller to hit a single target.]] |
||
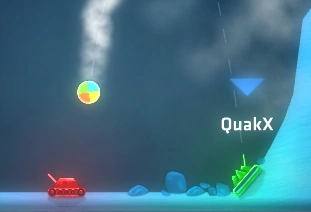
| + | * Landing a Dual Roller on an enemy tank slightly to the side of the tank at the bottom of the map will cause both rollers and the impact to hit dealing 60 damage. (This placement is incredibly precise. Missing this placement can cause one or both rollers to miss.) |
||
| + | *If your enemy is on/overlooking a steep cliff, aiming Dual Roller ~20 PU underneath the enemy tank is an easy way to ensure you hit the enemy with all 3 parts of the dual roller. This placement isn't very precise, however if the shot lands too close or too far beneath the tank, this weapon can yield 0 damage. |
||
| + | *Against a single target, it is best to land the spreader flare ~45 to 50 PU away from the target while on flat terrain. This results in 4 of the projectiles hitting the enemy for a total of 60 damage. |
||
[[Category:Weapons]] |
[[Category:Weapons]] |
||
Revision as of 13:37, 29 July 2020
Unlocked after reaching Level 74
Roll right? Roll left? Why not both?
Dual-Roller
Dual-Roller
|
The player shoots a single, very colorful Roller that can make people confused on their first shot wondering whether it will roll forward or backward. But upon impact that can deal 20 damage, it splits up to two smaller rollers moving in both directions dealing 20 more damage each. Be careful though as it can jump past enemies that are too close to the initial impact. |
|
Spreader
| The second and final tier turns the initial shot to a flare that looks more identical to its icon, upon landing, 9 green rollers will fall down from the sky, the first 4 moving left, the middle one staying in place, and the last four moving on the right. Some rollers move faster than the others but they all have the same lifespan and damage |
|
Tips & Trivia

This placement at the bottom of the map ensures all parts of the dual roller to hit a single target.
- Landing a Dual Roller on an enemy tank slightly to the side of the tank at the bottom of the map will cause both rollers and the impact to hit dealing 60 damage. (This placement is incredibly precise. Missing this placement can cause one or both rollers to miss.)
- If your enemy is on/overlooking a steep cliff, aiming Dual Roller ~20 PU underneath the enemy tank is an easy way to ensure you hit the enemy with all 3 parts of the dual roller. This placement isn't very precise, however if the shot lands too close or too far beneath the tank, this weapon can yield 0 damage.
- Against a single target, it is best to land the spreader flare ~45 to 50 PU away from the target while on flat terrain. This results in 4 of the projectiles hitting the enemy for a total of 60 damage.